Snort IDS System is an open-source network intrusion detection system software for Linux and Windows that detects emerging threats.
Snort has already developed a subscription and free service for attack signature updates and a mechanism for attack detection and alerting.
Tap of the main Internet line is not an ideal solution for some cases. A redundant router connected with VRRP is an example, and for that reason it is great to have a solution based only on the Mikrotik Sniffing Stream.
IDS Solution
To install the IDS Snort solution, the computer needs to run on a Linux OS. Download and install Snort following the OS-specific manual. If there is no binary for your OS, you can compile it from the source. Snort Installation Procedures are available on the Snort.org website. After full installation, follow the configuration parameters to set up Snort. Subscribe to the Snort site to get the latest Regular User rules with attack signatures and set them as in the manual.
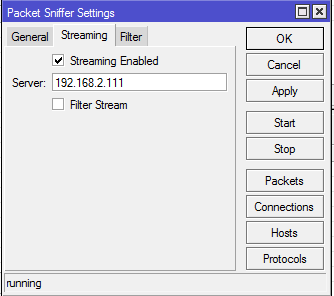
To set Mikrotik, you need to install the Calea package and open the Sniffing Tool. Set Sniffer to list all Interfaces, and uncheck the Only Headers box. Open the Streaming tab, enter the IP address of the Linux server, check Streaming Enabled, and uncheck Filter Stream. Start your sniffing.
At this point, Mikrotik will start streaming any passing packet via Tazmen Sniffer Protocol (TZSP) to a specified Streaming Server. Unfortunately, we can not just start Snort in Sniffing mode and collect packets, as these streamed packets are encapsulated in the TZSP protocol. Packets need to be de-encapsulated via the Mikrotik tool Traft. You need to download Traft.
wget http://www.mikrotik.com/download/trafr.tgzTraft receives packets via default UDP port 37008, and you should let it pass on iptable if there are blocking rules.
After unpacking Traft, you should be able to test receiving packets by command:
./trafr -s | tcpdump -r - -nIf you see a packet dump by tcpdump it means that MT sends packets, and tcpdump uses them de-encapsulated from TZSP correctly.
The next step is to active Snort with Traft with the command:
./trafr -s | tcpdump -r - -nIf you get messages that confirm settings and rules loaded successfully, wait a few moments and then stop the process with Control+C. If statistics show numbers different than 0, it means that Snort works with Traft.
Snort has to be started as a process that can not be demonized because of Traft data injection. That means you have to run it directly on the console or use a tool like “screen.”
trafr -s | snort -c /etc/snort/snort.conf -l /var/log/snort/ -r -It instructs Snort to use a specified configuration and log path.
IPS Solution
Snort has a built-in IPS (inline) solution, but only for the cases where it is a middle device (device between router and internet). In this scenario, IDS is a dedicated device that receives and processes sniffed data from different MT routers. As the first step, we should enable logging of IDS alerts at Syslog by removing comment form configuration fail snort.conf at line output alert_syslog:
LOG_AUTH LOG_ALERTThat way, after any alert, a new syslog line will appear.
For the Mirkotik IPS solution, we should have a way to react to different alerts. For some alerts, we should create roles that block specific malicious traffic. There are different solutions, but none of them support the Mikrotik platform. To resolve this issue, I have created a few scripts:
On the Mikrotik side: Create a script with the following code:
:global ip

local time ([/system clock get time]+("00:05:00"))
if ($time > "23:59:59") do={
  :local time "00:05:00"
}

/ip firewall address-list add list=blacklist address=$ip comment=$time
This script adds some IP, specified by the global variable ip, to the address list in the firewall. Next is to add a filter rule that drops or even rejects access to addresses from the list blacklist.
/ip firewall filter add src-address-list=blacklist action=rejectFollowing that, you need to create a way to automatically remove blocked IP after 5 minutes by adding a new scheduler that is run every minute with the next script on it:
:local currentTime [/system clock get time]


foreach i in=[/ip firewall address-list find list=blacklist] do={

         :local comment [/ip firewall address-list get $i comment]

         :local ip [/ip firewall address-list get $i address]

                     :if ( $comment < $currentTime ) do={

                           /ip firewall address-list remove [find address=$ip]

                  }

}
The scheduler checks every minute if there is any address in the address list that has in the comment time passed the current time and deletes this IP. After that, you should create user for ex. ips with some passwords and restrictions to log only from Linux server IP.
/user add name=ips password=1231 address=192.168.2.111Also, make sure that you have enabled the SSH service for the Linux server’s IP.
On the IDS side: A small PHP script is developed to check syslog every minute. If it finds a “Priority 1” alert it connects to MT via SSH and active filter script for alerts source IP address. PHP source is following:
<?php

$blocked=array();

exec('cat /var/log/messages | grep "`date -d "-1 minute" "+%b %e %H:%M"`"',$lastMin); foreach($lastMin as $line) {

if (strpos($line,"Priority: 1")!==FALSE || strpos($line,"portscan")!==FALSE)

{

preg_match("/\d{1,3}\.\d{1,3}\.\d{1,3}\.\d{1,3}/", $line, $matches); $filter=$matches[0];

if (!in_array($filter, $blocked)) {

$blocked[]=$filter;

if (strpos($filter,"192.168.")!==FALSE) continue; //Protected space sendMikrotik('192.168.2.1', 'ips', 'pass',$filter); // Mikrotik 1 sendMikrotik('192.168.2.10', 'ips', 'pass',$filter); // Mikrotik 2 sendMikrotik('192.168.2.4', 'ips', 'pass',$filter); // Mikrotik 3 } }

} function sendMikrotik($mt,$user,$pass,$filter) { $connection = ssh2_connect($mt); ssh2_auth_password($connection,$user,$pass); sleep(1); $stream = ssh2_exec($connection, ':global ip '.$filter); $stream = ssh2_exec($connection, '/system script run filter'); $stream = ssh2_exec($connection, 'quit'); }
PHP script ignores alerts originating from 192.168. network and react only on alerts Priority 1 and portscan. When a new alert is detected, the script parses IP addresses and sends via SSH commands to Mikrotik to activate the created filter script and block the attacker’s IP address for 5 minutes. In this example, we had more then one Mikrotik ruter that apply same filtering.
The only thing left is to add a Cron job to run a PHP script every minute so it can process every minute of syslog.
* * * * * php /root/ips.php